The first job was to fit the recently arrived microbore pipe down the tunnel. Once the pipe was cut and straightened-out this literally took seconds thanks to the previous prep work. The ends are left long and loose for now. I'm expecting four gas-tight christmas tree type end fittings any day now.

I've just realised how dirty the aluminium is. That'll need a hoover and wipe over then.
Next up was another newly arrived item, namely an oil cooler take-off plate to replace the OE oil-to-water cooler. The original plan here was to use a sandwich plate in-between the oil filter and the block to then direct the oil to the front-mounted air-oil radiator. However, a few things were troubling me about this. Firstly the sandwich plate would mean that the bottom water hose would have to be spaced away from its mounting lug. Secondly, space - evan having moved the pipe - was very tight. Thirdly, the oil hose runs to the front of the car were fairly long. Fourth and lastly, the water-to-oil cooler would remain. So, do you run two oil coolers? Do you loop the water to oil cooler out? The final decider was the fact that I've heard that the water pump is a bit marginal. I've never wanted to fit an external water pump due to the extra weight, complexity and the additional potential failure point. As such I decided that the best course of action was to reduce the workload on the water pump as much as possible. This meant that the water to oil cooler had to go. As such I toured the interweb for solutions. Eventually I found a racing buggy parts place in the USA who was happy to ship to Gloucestershire. I placed my order and waited. In the mean time I saw a post on Locostbuilders from a chap (Adithorp) who was looking for a replacement cooler. I contacted Adi and did a deal on the Yam cooler and then even managed to persuade him to buy the sandwich plate that I'd bought previously - admittedly for a song.
The kit was advertised as fitting all R1s from 1998 to 2009, so 4XV to 'Big Bang' - it all looked good. However, on trial fitting I found that the bolt was too long and fouled a little flange in the oil galley. There was only one thing for it - chop it down and tidy it up. With that I sent Rich at RK Performance a quick text to check what the bolt should be torqued to. He kindly replied with the answer (63Nm) and I finished the job off.
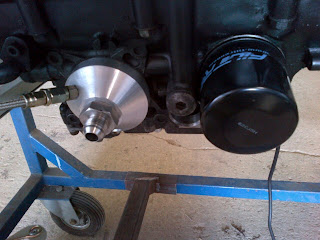
When I ordered the take-off plate I paid a little extra to have a hole drilled and tapped for the oil pressure sensor feed. Andy Bates had supplied the hose and fittings when I ordered the dash from him. Having given him a quick call to check the thread of the supplied fittings I screwed it all together. The other end can be seen here.

The only slight issue is that being a single rivet mounting the sensor wants to move all the time. I've got PU adhesive underneath it and the cable tie in the foreground is just there to steady it while it dries but I suspect that I'll have to do something else to keep it still. Also visible in the photo are some of the top water hoses. I'll come back to water hoses in a moment. Before I do, it's worth stating that the standard Yamaha engine mount bolts have now been turned-down and re-threaded for the mount here and the similar one below.
Looking at some build blogs for the 5VY R1 engine, I spotted that the hose that exits the water pump terminates in a different way to the 4C8. The packaging on the later bike is obviously slightly different and the water is sent ninety degrees up towards the top of the motor. This isn't much good to me and hence RGB's CHAMPIONSHIP LEADER, www.austengreenway.co.uk is hopefully sending me a 5VY pipe that leaves the water at the bottom of the engine bay. I can then more-or-less copy what others have done. I have been looking at efficient ways to tie-in the header bottle and the best I came up with was a turned insert attached to a 25mm t-piece. Here it is.

A 10mm I/D hose will run from the header tank to the bottom hose. It helps when Dave isn't far away and can turn up something like this in a matter of minutes.

The rest of the day was spent on the wiring which, as one might expect, is proving slow going.
TC
No comments:
Post a Comment