Sunday, 29 September 2013

The Cable Guy

I had a friend of a colleague join me in the workshop this morning.  Neil Sharp is a proper auto electrician. Perhaps surprisingly he wasn't brought-in to fault find.  Not yet.  I needed to get the battery cables made-up and rather than buy them in and then find that they are all the wrong length, I'd asked Neil to do it on the car. Neil, being a pro, felt that it was a good idea to (a) fit a big fuse and; (b) use 300amp cable for the first leg, on the basis that if I ever engaged the starter and the reverse at the same time it might need it.  It looks whopping and is a nightmare to get tidy but who am I to argue?
In theory I should be able to test the bike-side of the loom now; see if the throttle bodies will cycle, the fuel pump will energise etc.  I didn't do it yesterday as I had to knock-off early to do some other stuff and then get to dinner with the in-laws.
Just to re-state the point, we are some p-clips and conduit short of a tidy job.
Honest.

Saturday, 21 September 2013

Yawnabore R1

If there was ever a signal that I've spent too much time building this car, or more specifically too much time thinking about it, here it is:
On the bottom here is the water-in pipe which fits into the bottom of the engine on a 2007/8 R1.  On the top is the same part for a 2004-6 R1.  While the bottom-end on the two models is, in material-terms, the same Yamaha have obviously improved the packaging of the motors.  Unfortunately, for someone sticking these engines into a front-engined car, it's a pain in the arse as the water flows from the front at near-floor level rather than from up-on-high.  After harassing Austen Greenway for months, he finally sent me one of his spares and I fitted this today.  The water system is now pretty much as far as I can take it.  The aluminium fabricator wunderkind needs to do the rest. 

In other boring water-pipe news. I took a hacksaw and flap-wheel to one of the other water pipes today. I've removed the leg that took water to the oil-water cooler, since I don't have one any more.  I didn't want to have a dead-leg; if the water pump is a bit marginal, I want to make flow as straightforward as possible.
I need to get the hole welded-up now.
Dave has done an amazing job with the carbon airbox - it wasn't quite wide enough for the throttle body trumpets and was yet too wide for the throttle servo motors.  A couple of small moulds and a bit of cutting'n'bonding later and its a bonza job - if you need something similar, speak to Track Developments.
I'm not sure what it's cost me yet bit it has to be worth it.  There's a bit of a debate about inlet trumpets on the RGB forum at present.  I will be furious if mine aren't permitted next year but I can't believe it will happen.
Something which hasn't gone my way is the the oil system; having tried to marry the fittings on my oil cooler with those of my take-off plate I gave up and bought the same cooler with smaller fittings to suit the rest of the system.  I could only find one single unit that would do.  It arrived.
And is going back, leaving me with a problem.

TC

Sunday, 15 September 2013

Olibobs

The lack of activity has been due to two much-needed weeks island-hopping n Greece.

Car-building recommenced yesterday with a couple of minor-looking areas receiving attention..  Firstly the bus bar for the accumulated earths from the bike loom was finished-off.
Then I set about finding a place for the EXUP and airbox motors to live.  Neither are actually being used in the installation but at least the EXUP needs to be kept.  I've received conflicting information about the trumpet servo so it's staying just-in case. 
The bracket is a piece of aluminium angle manipulated to suit.
TC 

Saturday, 17 August 2013

Dialogue

To catch up with those points that I didn't really make last week:

I looked at aluminium hubs for a while.  I couldn't find any where nobody hadn't had some sort of issue.  It didn't matter if it was CompBrake, Rally Design or HiSpec - the web is awash with comments where things haven't been quite right.  I was actually contemplating sticking with the steel originals when a friend mentioned that he had a set of unknown origin that he'd bought some years earlier with the wrong bearings as an accompaniment.  Thankfully, said friend was an engineer and had carefully measured the dimensions and ordered the correct bearings.  He'd just never got around to fitting them.  I said I'd take them.  On collecting them I was pretty sure that they were HiSpec.  This has more or less been confirmed since as I ordered their dust caps and they fit a treat.  The same cant be said for the discs however, or more correctly the hubs don't fit standard discs as they should.  The PCD of the mounting hole seems to be just out.  I've managed to solve this by drilling out the the holes on the disc to 7/16".  Not a major problem but rather confirms what I've heard about HiSpec.  To give them credit where due, the dust caps arrived very quickly.

Talking of good service, I just have to mention EBC, specifically Bob Sketchly, Head of Technical Support. Bob is motorsport-mad and a very committed Marshall.  He also seems to be in charge of the MSA license holders discount scheme.  I had a ludicrously good deal on Turbogroove discs and Yellowstuff pads.  Top kit at a fantastic price.

What next?  Oh yes, we weighed the chassis and bodywork.  There's a lot still to go on but I'm pretty sure we'll be close to the weight limit.  Particularly if I can reverse my own personal fitness trend.

The bodywork went on pretty well considering - I'm going to have to be pretty mercenary when it comes to trimming the arch-lip returns.  In essence I'll be removing the returns altogether.  There's a number of internal sections of the bodywork - they enclose the engine bay and boot area mostly.  The rear has all-but-gone already and I've resolved to give the front the same treatment; it's not doing anything useful on a race car.

Also not of any use is my right rear wheel which is leaking.  I need to chuck it in a bath and check that it's not just the valve seating before I pull the rim apart again and have another go at building it up.  The other three have rock-solid pressures.

So, that was last week's news.  What about this week?  My focus has been on getting some more of the electrical components in place and working towards having the engine-side of the loom completed and tested in the next couple of weeks.
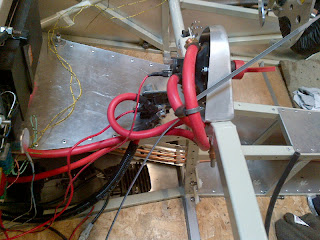
Above is the starter solenoid.  When I used one of these on my MNR people couldn't understand why I didn't use the bike part.  The reasons are twofold: (i) the bike relay is 'bundled' in with loads of stuff that I don't need; (ii) The Lucas unit is well-proven and very easy to check that it's operating.  The master switch is just a few inches above the solenoid so the cable runs are as short as possible.  The red cable seen is the main feed to the wiring module.
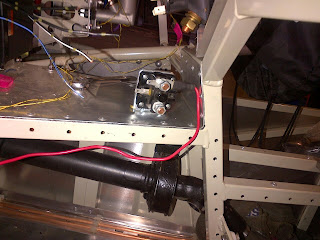
This is the regulator-rectifier.  While the Yamaha units have a much better reputation than some, they still need a nice panel to help soak-away heat and ideally a flow of air. Hence, this is the bottom of the transmission tunnel.  
This bus-bar will collate the six(!) earths from the slimmed-down bike loom and ECU. Apparently this is the most reliable way to do this.  Below is the wiring for the bike pump which will be housed in the swirl pot. The  live cable for this was a bit of a mess thanks to the spliced-in aftermarket immobiliser.  Hence it now contains a join which is very reliant on the solder which isn't ideal but the multi-meter tells me that all is well and I've protected the integrity of the join pretty well.
While I've been on-sparks, Dave has been charged with modifying the only carbon fibre piece on the car. The throttle bodies need their velocity-stacks/trumpets to work.  In an effort to achieve this and keep any bonnet bulge as small as possible (I sit LOW in the car) I've bought an ITG Trumpet Tray -catchy title eh?- which is actually made by carbon-meisters Reverie.
Unfortunately, this lovely piece of kit fouls the fly-by-wire throttle actuator and also isn't quite wide enough to meet two of the six trumpet mounting holes.
Thankfully Track Developments have constructed carbon parts a lot more complex than that which I need, so Dave is already up-and-running making a couple of moulds which will form new sections of the tray. Sounds easy but I'm glad he's doing it!

TC

Sunday, 11 August 2013

Words will wait.

I've precious little time for prose today but wanted to get some images up anyway as I've passed a couple of important milestones.


Things to discuss (mainly to remind myself:)

  • Hi-spec hubs
  • EBC Brakes
  • Weight
  • Tight arches
  • Extreme Camber
  • How mercenary to be with GRP
  • Right rear wheel

TC

Saturday, 3 August 2013

As safe as houses.

I've just collected my fully welded cage from our local blacksmith/ fabricator/ welder: http://cecilsofblakeney.co.uk/

Here it is pictured propped-up against our gate.

It needs a little bit of dressing still but it's a very solid job.
The headrest that I originally bought for an abandoned project in early 2010 will now bolt straight on.
The same is true of the rain light that I bought at about the same time.
I need to get it powdercoated now - and I need to use someone new as Steve's oven isn't big enough. I do have a plan.
That's about it for this week.  DIY to do.

TC

Saturday, 27 July 2013

Real Princess-related news

Today saw some decent progress albeit not without a couple of issues.  The most annoying issue is that I've found that the brake discs that I bought in good faith years ago aren't standard Cortina dimensions.  After a quick bit of research it seems that they are suitable for the now rather retro 'upgrade' to Austin Princess calipers (boat anchors.)  I need some new discs.  Despite this, we have four corners at last.
I spent about twenty minutes just looking at it; the car is really starting to match my aspirations.  The second issue is evident above and more patently obvious below:
The steering arms on the Escort rack have been shortened too much.  Easily sorted, deal done.  Anyway, the suspension is on but only finger-tight.  When we come to set the car up there are up to 12 rod-ends to potentially play with.
All of the specially machined spacers are in place and everything fits together in a pretty pleasing manner. Incidentally, some of the spacers are plated mild steel and some are stainless - I moved to stainless when I got fed-up of paying the plater.  If you look closely at the top damper mounts you'll see that some of the spacers have even be 'light-weighted.'
The temptation to fit a wheel was overwhelming.  Or two:
It almost looks like an actual vehicle. If I was building the Moon Buggy from 'Diamonds are Forever' I could probably conclude that I'm nearly there!  Sadly. I'm not and there is much still to do.
In the foreground here you can see the new brake lines that run from the master cylinders to the bulkhead. They are these gaudy colours for a reason.  Blue = Back and Fuchsia = Front.  Sadly they don't make fuchsia-coloured brake lines anymore so lilac will have to do.  Behind the pedal box you can see the starter solenoid.  I can't decide where to put it.  But that is for another day.

TC