I've just collected my fully welded cage from our local blacksmith/ fabricator/ welder: http://cecilsofblakeney.co.uk/
Here it is pictured propped-up against our gate.
It needs a little bit of dressing still but it's a very solid job.
The headrest that I originally bought for an abandoned project in early 2010 will now bolt straight on.
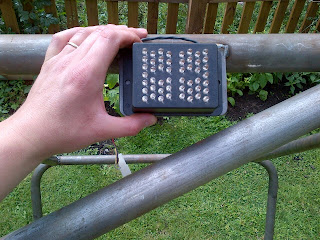
The same is true of the rain light that I bought at about the same time.
I need to get it powdercoated now - and I need to use someone new as Steve's oven isn't big enough. I do have a plan.
That's about it for this week. DIY to do.
TC
A blog that chronicles my adventures building, owning, fettling and racing various kit cars.
Saturday, 3 August 2013
Saturday, 27 July 2013
Real Princess-related news
Today saw some decent progress albeit not without a couple of issues. The most annoying issue is that I've found that the brake discs that I bought in good faith years ago aren't standard Cortina dimensions. After a quick bit of research it seems that they are suitable for the now rather retro 'upgrade' to Austin Princess calipers (boat anchors.) I need some new discs. Despite this, we have four corners at last.
I spent about twenty minutes just looking at it; the car is really starting to match my aspirations. The second issue is evident above and more patently obvious below:
The steering arms on the Escort rack have been shortened too much. Easily sorted, deal done. Anyway, the suspension is on but only finger-tight. When we come to set the car up there are up to 12 rod-ends to potentially play with.
All of the specially machined spacers are in place and everything fits together in a pretty pleasing manner. Incidentally, some of the spacers are plated mild steel and some are stainless - I moved to stainless when I got fed-up of paying the plater. If you look closely at the top damper mounts you'll see that some of the spacers have even be 'light-weighted.'
The temptation to fit a wheel was overwhelming. Or two:
It almost looks like an actual vehicle. If I was building the Moon Buggy from 'Diamonds are Forever' I could probably conclude that I'm nearly there! Sadly. I'm not and there is much still to do.
In the foreground here you can see the new brake lines that run from the master cylinders to the bulkhead. They are these gaudy colours for a reason. Blue = Back and Fuchsia = Front. Sadly they don't make fuchsia-coloured brake lines anymore so lilac will have to do. Behind the pedal box you can see the starter solenoid. I can't decide where to put it. But that is for another day.
Tuesday, 16 July 2013
Haranguing indeed.
Last Saturday I began 'eating the frog' that is connecting-up my wiring. It's a fillip that a couple of minor changes can start to make it all look more manageable.
I need to add some electronic components to sort-out the last remaining live feeds to the loom. The first is standard motorsport-fare - a ballast resistor in the coil feed that stops the motor from running-on when the master switch is turned off. The second is more of an experiment in that in junking the bike's rather confusing relay assembly I've also stripped-out a zener diode assembly that presumably acts to protect certain components when the engine is cranked. Having got some advice, I've basically ended-up with this:
This is simply 1N5408 rectifier diode and a 18-24V zener diode with a 3W rating soldered together. Will it work? There's only one way to find out. In other news, one of the back-stays was checked for length and tig welded up.
I've also bolted the original horn from the bike to the chassis; this is one of the 'road-going' elements that puts the R into RGB. It's also necessary if I choose to IVA the Gemini so either way I need it. Finally, I collected the powder-coated wishbones and Panhard rod so those are now ready to fit, hopefully on Saturday.
If I can gather enough bodies to help lift the car from the trolley, it could roll.
TC
Wednesday, 10 July 2013
Arse backwards.
This was actually finished (the axle is in) before the cage went in and I forgot to post the photo:
TC
TC
Sunday, 7 July 2013
Roll up, roll up.
Yesterday was a pretty good day. Reflecting back, I did very little: fitted the fuel pump; built up the front suspension to check the top wishbone length; reamed all the suspension pick-ups to remove the powdercoat; drilled a hole for the side-intrusion bar.
Thankfully Dave was on-site an he achieved a lot more: machined stainless inserts for the front suspension; completed stainless spacers for the dampers (top and bottom); fitted dampers; completed welding on front wishbones (once they'd been checked to give correct camber); notched front roll hoop and tacked in place; notched 'roof bars' and tacked in place.
So, that's a good day all-told. I've now got the remaining suspension parts to deliver for powdercoating (wishbones x 6 [two spares] and the panhard rod.) I'm then going to get a local fabricator/welder to finish welding the roll cage so Dave can concentrate on some other stuff, namely the side intrusion bars and the ARBs.
I therefore really need to crack-on with the wiring - how many times have I now said that?
TC
Monday, 1 July 2013
Can't sleep, so a quick post on choices.
I've had a couple of small choices to make since the last post. One involved a change of plans in terms of the fuel pump; there just isn't enough room to use the preferred Facet Gold Flo Silver Top Competition filter - it's about as big as its name. As a result, I've had to invest in a smaller solid state Facet. Their reputation isn't quite as good as for the bigger units but, practically, I have little choice. I'm sure it'll work a treat - it's only a lift pump after all.
As you can see, the Gold Flo is back in it's box. Open to offers...
The other choice that I needed to make was to decide which centre bearing spacer to use. I had three of these water-cut (£15 the lot!) in three different thicknesses - 5mm, 6mm and 8mm.
The 8mm was obviously going to be too thick once I eyed-it-up. The 5mm plate gave the straightest prop run possible but does result in the UJ running a little too close to the chassis. Hence, the 6mm plate got the nod.
And now to try again - to bed!
TC
Saturday, 15 June 2013
Axle Fuel-ey
For the second time this year I made a late call not to travel to watch the RGB racing and instead headed for the workshop. It may not be Beverley Hills (tenuous, I know) but it's better than working on the patio.
The first job was to finish the low pressure hard-pipe fuel lines. I'd originally planned to use smart Christmas Tree-style fittings at both ends but this wasn't practical at the rear due to limited space. The front end has worked well though.
One of these will supply fuel to the swirl pot and one will act as the over-flow taking fuel back to the main tank. Although this is only the low pressure part of the fuel system, I'm not happy having the flexible lines connected without some sort of barb or bead. After some research, I decided that Yorkshire-type fittings may provide the solution. These are pipe fittings that already have the necessary solder attached; pretty clever. They, not surprisingly, don't seem to make them to use as beads on kit cars so I had to improvise. I therefore purchased a straight joining fitting and cut it in half. After a bit of filing and sanding I slid them onto the cleaned up ends of the pipes and applied some heat - via a brilliant little torch that I own that was intended for browning crème brulees. I'm very happy with the result.
I'm slightly less happy with the wavy floor/ This was damaged when the spit arrangement that we had the chassis on collapsed at one end. Once the rear panel goes on it should straighten it out a bit. The fuel lines were the last thing that I needed to do before something genuinely meaningful happened; the axle is in!
I'd be lying if I said that I wasn't a little alarmed by the proximity of the differential to driver's side of the transmission tunnel but I think it will just be okay. We'll find out at the first test no doubt.
You may have noticed that in the photograph two-up that there are a couple of odd looking thing at the back of the chassis. These are the exquisitely machined end-fittings for the roll cage back-stays. Have you seen something similar before? If it's good enough for formula rep and 750MC board member Hoverd, it's good enough for me.
This uses a huge 5/8" shank rod end and a 1/2" bolt in double shear. It's pretty damn strong. Last job of the day was to fit my Christmas present from Kate - it's a Varley Red Top 25 battery.
That'll be something else to connect the cascade of wires too then.
Next? Front axle and rolling hopefully.
TC
.
Subscribe to:
Posts (Atom)