Wednesday, 15 May 2013

Look after the pennies and the pounds will...

Holy smoke; a couple of years away from a full build and you forget what the little things cost.  This week I've bought a load of 'smaller items' like silicone hoses, a handbrake cable, cable-tie bases, fuel pipe, a flexi brake line, aluminium tape, bearings, wheel cylinders...
Total cost?  In official technical terms, an absolute shit-load.  For a bit of sport (torment) I just had a quick look at what I could've bought instead of building the Gemini.  Ha - hilarious.  Would I do it again?  Right now - no.  My view is likely to change on the first successful test but right now it feels rather painful.  Goodness knows what Mrs C thinks.  Bless her.

Still, we've come this far: onwards - will hopefully fit some of this folly tomorrow.

Saturday, 11 May 2013

Because you're Würth it.

I'm coming to the end of a much needed week off.  The garden got some attention but I've managed three fairly full days on the car - if you include half a day running around for the correct tyre valves.  Ah, the tyres and wheels...

Having got the wheels powdercoated as previously described, I needed to bolt them back together.  I turned to the internet for advice and found lots of conflicting information as one would expect.  In the end I settled on some advice from a chap who makes wheels for a living.  I therefore had a shopping list which consisted of good quality marine grade nuts and bolts, good quality silicone sealant and a new 3/8" drive torque wrench,
The picture above actually shows the fourth wheel mid-way through construction.  You may ask what the highlighter pen is for.  This is for numbering the holes on the back of the wheel so that I kept in sequence - opposites as much as is possible, N-S-E-W and torquing-down is two stages.  You may also ask what the secateurs are for.  They aren't for anything - except acting as a paperweight.  Naturally on wheel number one I used too much sealant and made a bit of a mess.  By the fourth wheel I was poetry in motion.

Now, before refurbishment a couple of the wheels had a LOT of weight stuck to them - one of them had 250g attached!  I was very keen to do better and suspected that the bare mounting faces would help.  I also didn't want the things to leak.  None of this was certain.  Anyway, I ordered the tyres (RGB control Yoko A048Rs) and went to get them fitted.  "Errr, we don't have any valves that will fit them Sir."  Oh, great.  It seems that the wheels were designed for 'special' valves - either Austin Metro valves or costly aluminium racing things.  I did find the Metro type items on eBay but the expected delivery date was next week.  Merlin Motorsport eventually came to the rescue (@ £23) after I'd wasted £10 on some that didn't fit.  Rats.

Anyway, what to do once tyres have met wheels - and they don't leak AND they don't need much weight at all?  Introduce wheels and tyres to bodywork of course.  The Retrorocket is born, almost.
Okay, so at this stage effort was essentially purely logistical.  What else has happened?  Well, the biggest news is that Mrs C joined me on Thursday and between us, with the help of an engine crane, we craned-in the engine.  No mishaps, no disasters.  Kate continued to help by cutting-out the heat-proof mat to protect the battery from exhaust heat and by bolting the oil cooler in place with thread-lock and spring washers.    Between us some brake lines were finished too.  
I've also fitted and tested the reverse mechanism.  The teeth rounding has made a big diffrence but it could do with a stronger spring to push the one gear onto the other so I need to investigate that at some stage.  I've also fitted the button to energise the reverse switch itself.  This is deliberately well out of harm's way, next to the brake master cylinders in fact.

Today, I added the oil temperature sensor by replacing a plug on the end of the oil galley.  I'm not 100% convinced that it won't leak as the M16 to 1.8NPT adaptor was effectively countersunk so I had to hold the end of the sensor in the soft-jaw vice and turn the adaptor rather than the other way around.  Not ideal.

I've been back at the panel beating again too.  First I made a little triangular panel that sits at the back of the chassis.  I've not photographed this but it was a bit of a pig, needing a couple of bends.  The tubes that it is riveted-to are on different planes too - not unusual for the Gemini - Tough, but a good result.  It may house the lift-pump shortly and is crucial to the flat-floor.  I appreciate that this is meaningless without photos so I'll move-on.  The next panel that needed to be made was a little stand-off plate to mount the ECU on.  The regs say that the ECU has to be in plain view.  The ECU will now be visible and capable of being examined from the driver's seat or general cockpit area.  It's just held in place by velcro at the moment but it'll get a strap around it too.
And then I had a look at the wiring.  It doesn't look too bad in terms of cable lengths, with a couple of exceptions where extensions will be needed - but of course I have no idea if what I have planned will work.  We will see.  

So, useful progress.  

Next major step will be to get it rolling so I can line-up the bodywork in relation to the wheels and fit that.  I need to get the axles built-up first though.  

Dave....!?

Sunday, 21 April 2013

Give me a break brakes!

Having thought that the long brake line was sorted I found a kink near the bulkhead so have to start again; more cupro-nickel pipe now on order.  Grrr.

A change of tack then got the last of the aluminium floor panels fitted.  I suspect I've been sent the wrong grade of ali in this case - it's quite soft.  Since time is racing by, I went with it anyway - I'm sure that it'll be fine.
The main and front roll hoops have also tuned-up.  As the car is made specifically for me and, like Fat Joe I lean back, it means that the cage can be low-pro'.
It's amazing how different the car starts to look when it's got some monkey bars.

TC

Wednesday, 17 April 2013

Thanks Rich.

I collected the motor from Rich at http://rkperformanceparts.com/ this evening.  He's done a top job.  Not only has he done everything possible to give my engine a chance of performing as required despite the damage from being dropped by its last owner, he's been absolutely meticulous in the way that he's done everything required.

I'm sure that I'm not alone in having had great difficulty finding people who you trust with your 'stuff' - traders who will treat your equipment as well as you would, if not better. Rich is clearly one of these people - methodical, thorough, logical, full of good ideas and eager to do a first-class job.  If you have a bike or a bike motor, do not hesitate to use him.

My 4C8 R1 motor now benefits from:

  • A sump baffle - which needed plenty of fettling to fit well.
  • A new OE clutch with Barnett springs
  • Replaced covers (where the originals were damaged)
  • The required breather mods to stop the motor from throwing-out all its oil and going bang
  • New iridium plugs
  • Timing checked and chain tension adjusted
We've just got to hope that no further damage has been done that we can't see without a full strip-down and also that the bits that we know are less than 100% hang together.


TC

Monday, 15 April 2013

Useful Fillip

I stole a couple of hours this evening.  It was quite nice to do a couple of quick jobs where nothing went wrong.  I managed to bolt the brake line running to the rear of  the car to the footlwell.  The route was so obvious that it was a 'no-brainer' to drill out a few rivets and make more use of the same holes.
It's very difficult to get these pipes absolutely perfect but I think that is tidy enough.  I also bolted the master cylinders in-place.  I had to cut-down an allen key to be able to tighten the top-bolts.  I hadn't thought through the possible problems with cap-head bolts.  The pistons also needed to be cut to length.  Oh well, they look the part now.
 Finally. I trial fitted the powdercoated engine mounts.
You can also see the brake line heading down the tunnel.  It was nice to walk away from the car with nothing having been a problem.  I'd like more 'garage-time' like this.

TC

Sunday, 14 April 2013

From "F### it!" to frivolity.

I often explain to those who care to listen that the workshop is a place of sanctuary - one of the few places (alongside the likes of forest walks with Mrs C.) that I can go and forget about all of the troubles that life tends to throw at you.  Well, that went totally out of the window last weekend.

Things started okay.  A package had arrived during the week that contained, amongst other 'goodies', my kunifer brake pipe.  I spent the morning re-acquainting myself with methods of bending and forming the brake lines, with mixed success (and a metre or so of wasted pipe.)  This was anticipated and I was relatively happy; beavering away, concentrating on something other than work.  Then the phone rang.  It was Rich from http://rkperformanceparts.com/.  The news was sub-optimal; less than ideal; an unmitigated shitting disaster.  In the process of renewing covers and giving the engine a full inspection he'd uncovered a horrible bodge and a cracked crankcase.  I did my best to sound like a grounded, well-balanced individual on the phone but I may have sworn a bit.  Or a lot.  Rich, quite understandably, wanted me to go and have a look so we could decide what to do with the thing.  At this stage I started to feel that it was karma - I'd sounded a bit myopic, smug even when I'd bought the engine so I was now lying in the bed that I'd apparently made.  Oh well.  Nothing ventured etc.

So, I tried to shake-off the news and carry on with some other work.  Earlier in the week I'd popped across to see the reigning Class F RGB Champion Al Boulton and exchanged a small amount of money for a very nice Gemini-sized car cover.  I'd had a good look at Al's lovely Spire GT3 too and he'd kindly lent me some AVO shocks to have a look at. I'd found that the clevis-bracket for the dampers was too tight to the axle tube to allow the Protech's that I'd previously bought to fit without modifications.  Hence, I wanted to have a look to see if another brand of dampers would solve the issue.  So, having dragged the already powdercoated axle out of hibernation and tried the AVO dampers for size I quickly reached the conclusion that the brackets needed to be cut-off and new ones added.  My fabulous day had just got even more fabulous.  Thirty minutes later and the offending brackets were cut off and smoothed back with a flap wheel.  Two, apparently pointless brackets also got the same treatment.  After a good tidy-up and another look at the brake pipes I called it a (sodding miserable) day.

I managed to make a couple of all-too-fleeting visits to the workshop during the week.  I managed to finish the first of the three hard brake pipes and make some decent progress on the second.
I also bolted-in the radiator for (hopefully) the last time.
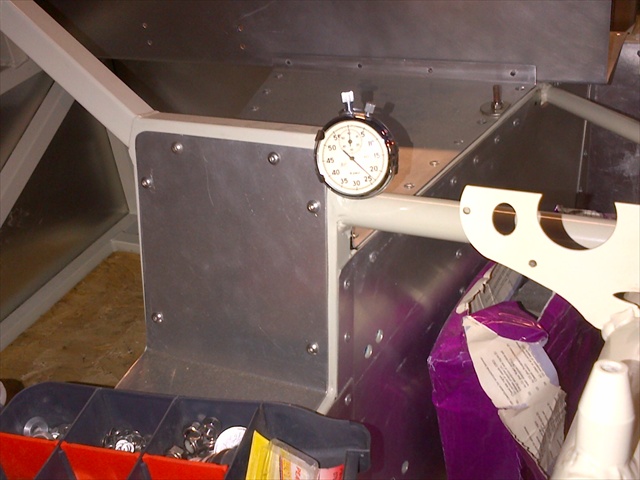
Finally, feeling the need to feel a bit better about the project, I decided to trial-fit my race-timing device.  Obviously this is total nonsense, decadent even but as the car is meant to be a 'study' of old meets new I just couldn't resist.  It's not terribly valuable and has a crack in it but I think it's great and will sit quite nicely alongside the Digidash2.

Finally, I did get across to see Rich and the engine.  We've decided to chance our arm.  It might last forever or it might fall apart and lock-up the crank on the dyno.

There's only one way to find out.

Tuesday, 2 April 2013

Wheely Nice

There's no going back on the colour scheme now.  Steve has sent me a picture of a coated wheel.
I'm not much looking forward to putting them back together but I'm sure that it'll be relatively painless.

TC